Recording in the studio is not just a matter of pointing a microphone at a source and pressing record: it is a process of technical and creative decisions that determine the quality, flexibility and ease of work in the subsequent mixing phase. Knowing what level to record at, how to organise takes, when to repeat and how to get the best out of each performer are skills as important as knowledge of the equipment.
Three ways to build a recording
Most professional recordings are built by combining three distinct approaches, each with its own advantages and technical implications.
Live recording
All musicians play simultaneously and the performance is captured in real time, with each instrument on its own channel and microphone. It is the most logistically demanding method — requiring more microphones, more channels and careful management of bleed between instruments — but it also produces the most cohesive results: the interaction between musicians, the shared breathing and the spontaneous dynamic adjustments are difficult to replicate when recording separately.
It is the standard method in jazz, classical music, acoustic ensemble recordings and any genre where the "life" of the collective performance is an essential part of the result. In rock and pop it is also used for tracking the rhythm section (drums, bass, rhythm guitar), which is then completed with vocal overdubs, solos and additional layers.
Overdubbing
Each instrument or voice is recorded separately, in successive layers. The first layer is typically the rhythmic foundation (drums and bass, or simply a click track and a reference demo), over which guitars, keyboards, vocals and other instruments are added in subsequent sessions.
Overdubbing allows:
- Each part to be repeated as many times as needed without affecting what has already been recorded.
- Working with the performer under optimal conditions of concentration, without the pressure of coordinating with other musicians in real time.
- Recording across different sessions and locations, which is particularly relevant in modern music production where collaborators record their parts in different studios or countries.
- Specific processing to be applied to each layer without affecting the others.
Its main limitation is that it can produce results that feel more "rigid" than live recording if not managed well: parts are aligned individually to the click track but may lose the organic interaction that gives a band playing together its life.
Comping
Comping (from compilation) is the process of listening to multiple takes of the same part and selecting the best fragments from each to assemble a definitive track made up of the best moments. It is not a recording technique in itself, but the step that follows: the intelligent editing of the captured takes.
In practice, the workflow is as follows: the vocalist or instrumentalist records several complete passes of the same part, all on separate tracks in the DAW (or on "lanes" within a single track). Once the takes are complete, the engineer and producer listen to each version and mark their preferred sections — perhaps the first verse from take 2, the chorus from take 4 and the bridge from take 1 — which are then edited and assembled into a single final track.
Comping demands consistency between takes: the same microphone in the same position, the same distance and the same gain level for all takes. Any technical variation between takes will make the edits audible in the final assembly.
The click track: tempo as reference
The click track is a metronome signal that the musician hears through the headphones while recording, serving as the tempo reference for the entire session. Recording to a click has significant technical advantages: it facilitates comping between takes (all parts are at the same tempo and are therefore interchangeable), allows overdubbing in subsequent sessions without synchronisation problems and simplifies any editing in the DAW.
Not all genres require a click: in jazz, classical music or acoustic folk, the tempo may flow with expressive freedom and the click can interfere with that naturalness. The decision to record with or without a click should be based on the desired result and the musical style.
Gain staging: the right level at every stage
Gain staging is the coordinated management of signal levels at every link in the audio chain, from the microphone preamplifier to the DAW. Its goal is for each stage to receive a signal with sufficient level above the noise floor, without approaching the distortion point of any component in the chain.
The difference between analogue and digital
In analogue audio, the reference level is 0 VU, equivalent to approximately +4 dBu. Analogue equipment has headroom (margin before distortion) of between 10 and 20 dB above that level, and the distortion that appears when it is exceeded is generally gradual and musically acceptable (tape saturation, transformer compression).
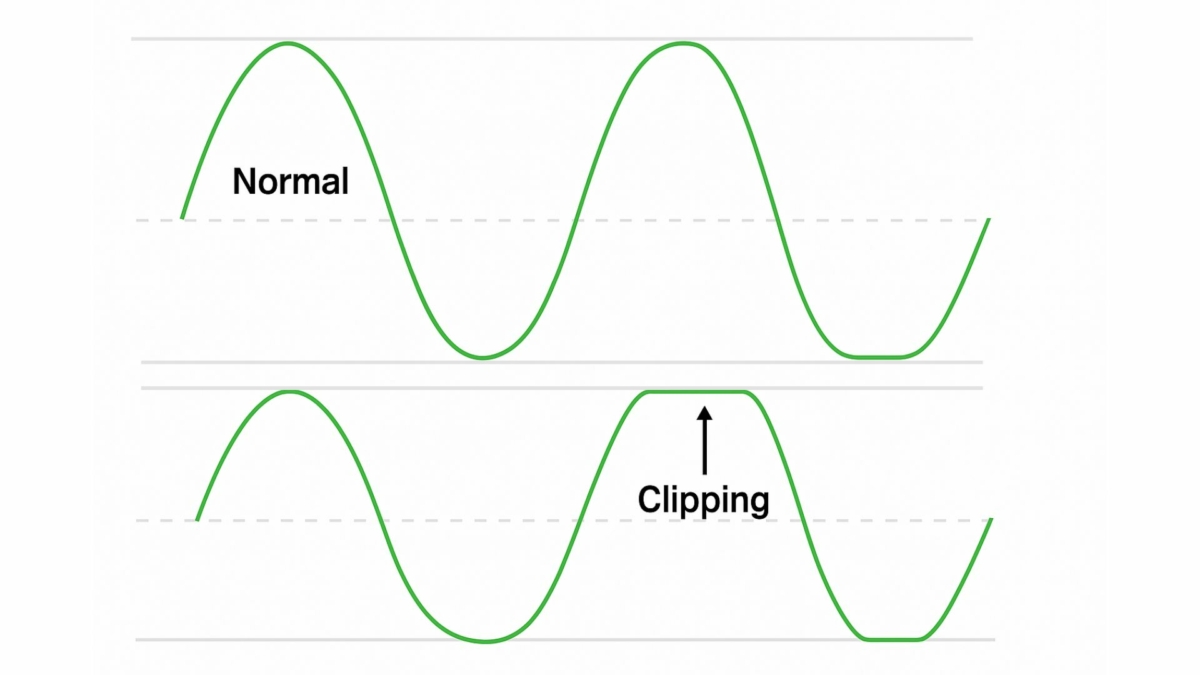
In digital audio, the absolute limit is 0 dBFS (decibels Full Scale). Above that point there is no headroom: the signal is simply cut at the maximum value, producing digital clipping — an abrupt, highly unpleasant distortion that is also irreparable. There is no way to recover the information lost in a digital clip.
The optimal recording level in digital
The standard reference for recording in a DAW is to keep signal peaks between -12 and -6 dBFS, with an average RMS level of approximately -18 dBFS. This leaves a generous safety margin above the peaks to protect against unexpected transients and to give the processing in mixing (compressors, equalisers, saturators) sufficient headroom to work without distorting the signal.
A signal recorded at -18 dBFS RMS is not "too quiet": in digital, the recording level does not affect the noise floor in the same way as in analogue. Modern 24-bit converters have a theoretical dynamic range of 144 dB, so a signal at -18 dBFS remains far above the converter's noise floor.
Level reference for digital recording
- Peaks: between -12 and -6 dBFS. Never exceed 0 dBFS.
- Average RMS level: around -18 dBFS for vocals and dynamic instruments.
- Background noise floor (room in silence): should remain below -60 dBFS.
- VU equivalent: 0 VU ≈ -18 dBFS on most professional interfaces.
The preamplifier gain point
The first step in gain staging is correctly setting the preamplifier gain. The gain knob should be adjusted so that the instrument or vocal signal reaches an appropriate level at the AD converter, without saturating the preamplifier or remaining so low that the preamp's own noise floor contaminates the recording.
The standard practice is to ask the musician to play or sing at the loudest level they will use during the session, and adjust the gain so that the loudest peaks reach between -12 and -6 dBFS on the DAW meter. If a peak exceeds that range during recording, it is better to reduce the gain slightly and repeat the take than to risk a clip.
Punch in/out: fixing without starting over
Punch in/out is a technique that allows a specific section of an existing track to be re-recorded without repeating the entire part. The DAW plays back the track until the marked entry point (punch in point), automatically enters record mode, and returns to playback mode at the exit point (punch out point).
It is particularly useful for:
- Correcting a wrong note or phrase in an otherwise near-perfect take without losing what is already good.
- Repairing an isolated technical problem (a fret buzz on a guitar, excessive sibilance on a vocal).
- Allowing the musician to focus exclusively on the section that needs improvement, with all their attention on that specific point.
For the punch to be imperceptible, the new recording must match the existing material in timbre, dynamics and room character. This means maintaining the microphone in exactly the same position, the same gain, and if possible having the musician "warm up" mentally through the preceding bars before the DAW activates record mode.
Vocal recording techniques
The voice is the most exposed and most personal element of any recording. The technical decisions made during the vocal session directly impact the quality and editability of the final result.
The pop filter
Plosive consonants (p, b, t, d, k) produce a burst of air that strikes the microphone capsule directly and generates a pronounced low-frequency thump that is very difficult to remove in mixing. The pop filter is a mesh or metal screen placed between the vocalist's mouth and the microphone that disperses that air before it reaches the capsule.

The correct placement is approximately 8–12 cm from the microphone, between the vocalist's mouth and the capsule — not pressed against the microphone or the vocalist's mouth. An alternative to the filter is to tilt the microphone 15–30° off the direct emission axis of the voice: the air from plosives passes to the side and the capsule captures the sound from a slightly offset angle, reducing plosives without a filter.
Distance and position
The distance between the vocalist's mouth and the microphone determines the balance between the proximity effect (bass boost when moving closer) and room capture. The typical distance for vocal recording is between 10 and 20 cm from the microphone, though this varies depending on the voice type and the desired result.
Powerful voices with strong low-end body may benefit from a little more distance to avoid excessive bass from the proximity effect. Thin or quiet voices may move closer to take advantage of that boost. It is important that the vocalist maintains a consistent distance throughout the entire session: changes in distance between takes will produce tonal variations that will make comping difficult.
Doubles and vocal layers
Doubles are second performances of exactly the same melody and lyrics, recorded on separate tracks and summed with the lead vocal in the mix. The subtle differences in pitch and timing between the lead vocal and the double create a characteristic thickening, width and presence effect. For the double to be effective, the vocalist should try to reproduce the original performance as faithfully as possible without trying to "improve" it: the subtle differences are what produces the effect, while large differences produce anomalies.
Harmonies are vocal parts with a different melody (typically a third or a fifth above or below the lead melody) recorded on additional tracks and summed in the mix. They add harmonic richness and musical dimension, and are the element that distinguishes the complex backing vocals of pop, gospel and rock productions.
Session organisation: notes and consistency
A well-organised recording session saves hours of work in the editing and mixing phase. The most relevant organisational decisions are:
- Document the equipment: Note which microphone, preamplifier and distance were used for each source. If the recording spans multiple sessions, replicating the exact setup guarantees that comping between sessions is imperceptible.
- Name and label tracks: Every DAW track should have a clear name identifying the source (Lead Vox, Rhythm Guitar L, Kick In, etc.). Unnamed tracks are the most frequent cause of confusion in sessions with many channels.
- Save scenes or snapshots: On digital consoles, saving the session state before any significant change allows returning to the previous point if something goes wrong.
- Reference take: Before recording an important session, it is common practice to do a complete test take to verify that the sound, levels and workflow are correct. It is better to discover a problem during the reference take than after recording an unrepeatable performance.
- Take management: Keep all takes, even the ones that seem to have failed. The take the musician discarded because of a mistake in bar three may contain the best twenty seconds of the entire session in another section.